Sunday is typically spent sleeping, eating, lounging, drinking, starting fights, enjoying the company of family and friends, shaving animals, more sleeping, and concluded with a pixie dancing contest. In an effort to add to the list, I attempted to create Quicktime VR (QTVR) panoramas from Half-Life 2 maps.
I finally figured it out (requires Quicktime or Quicktime Alternative)
Briefly: requires mat_envmaptgasize 512, envmap and GoCubic.
Like HL and Quake 2 (to an extent), HL2 contains a command which lets you create environment maps from within the game - while playing, type envmap into the console and it’ll produce 6 32x32 TGA images for you in a directory called ‘cubemap_screenshots’. It’s usually used for creating the reflection maps that make shiny things shine according to the environment.
32x32 images are no good for panoramas. They look like a bad prescription. So, the resolution can be upped using the mat_envmaptgasize command to the maximum (?) of 512x512 per image, which whilst not ideal, is 1,536 times better than 32x32. All you need to do is load up a map, turn cheats on, set the variable to 512, then run envmap to generate the images. Easy.
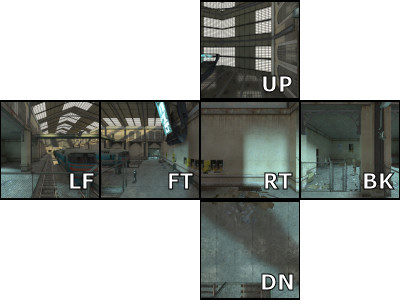
The generated images end up named ‘XX.tga’, where XX is coded as ft (front), lf (left), rt (right), bk (back/behind), up (up) and dn (down). For example:

The next step requires converting these images into the QTVR panorama. For this we require GoCubic, a free tool that will convert 6 rectilinear images (like the ones we have) into a bog-standard QTVR panorama.
GoCubic expects to be given 6 images named in sequence, i.e. ‘shot1.tga’, ‘shot2.tga’, ‘shot3.tga’, ‘shot4.tga’, ‘shot5.tga’ and ‘shot6.tga’. These map to the front, right, back, left, up and down images - but naturally, HL2’s naming differs. So, we need to rename the images we’ve already got to match, for example:
d1_trainstation_01rt.tga  d1_trainstation_1.tga

d1_trainstation_01ft.tga  d1_trainstation_2.tga

d1_trainstation_01lf.tga  d1_trainstation_3.tga

d1_trainstation_01bk.tga  d1_trainstation_4.tga

d1_trainstation_01up.tga  d1_trainstation_5.tga

d1_trainstation_01dn.tga  d1_trainstation_6.tga
All the files are now ready. Load up GoCubic and from the ‘Make Pano’ menu, select ‘Make Pano Movie…’. Browse to the location where you renamed the files, and select the first one (e.g. ‘d1_trainstation_1.tga’), and hit Open. Another browser will pop up asking where you want to save the generated panorama, so specify a filename or accept the default ‘default.mov’.
It’ll do a little crunching and within seconds you have your QTVR panorama. Simple.